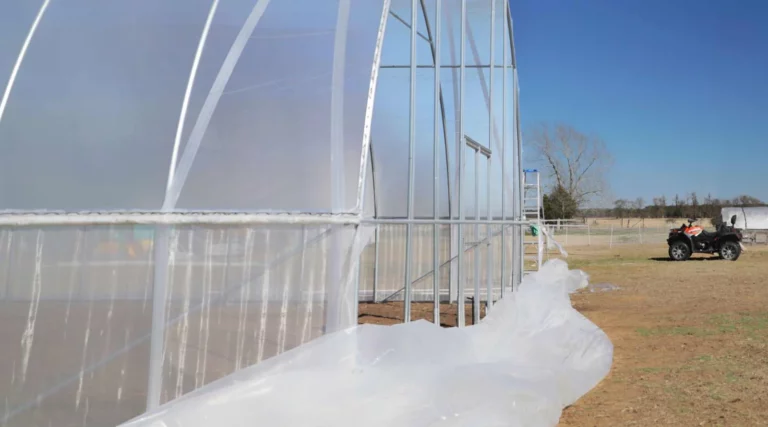
Here are the consecutive steps for attaching the plastic to the greenhouse.
- Unroll the greenhouse-grade polyethylene plastic over the frame.
- Ensure the plastic is taut and covers the entire greenhouse structure.
- Secure the plastic to the frame using greenhouse poly clips or a wiggle wire system.
- Install a base or channel at the bottom to hold the plastic in place and prevent drafts.
- Stretch the plastic tightly to prevent sagging and ensure a snug fit.
- Consider adding an inflated inner layer for improved insulation.
Types of Plastic Materials for Greenhouse Covering
A. commonly used plastic films for greenhouse covering
Greenhouse-covering materials are critical in creating a suitable environment for plant growth. Here, I’ll provide an overview of the most commonly used plastic films for greenhouse covering:
Polyethylene (PE): This is the most widely used material for greenhouse covering due to its affordability and effectiveness. It comes in various thicknesses, with the thicker films providing better insulation.
UV-resistant polyethylene is commonly chosen to withstand prolonged exposure to sunlight.
Polycarbonate (PC): Polycarbonate panels are known for their durability and excellent light transmission. They offer better insulation compared to polyethylene but come at a higher cost.
Polycarbonate is often used in greenhouses where long-term durability is a priority.
Polyvinyl Chloride (PVC): PVC films are durable and provide good insulation. They are resistant to UV radiation and are relatively easy to install. However, they can become brittle over time with exposure to sunlight.
Ethylene Vinyl Acetate (EVA): EVA films are known for their high light transmission properties. They are often used in regions where maximizing sunlight is crucial. However, EVA films may have a shorter lifespan compared to other options.
B. Choosing the appropriate plastic material for your greenhouse
Selecting the right plastic material for your greenhouse is essential for the success of your growing endeavors. Here are some factors to consider when making your choice:
Climate: Consider your local climate conditions. Polyethylene is suitable for most regions, while polycarbonate is better for areas with extreme weather or hailstorms.
Durability: If you want a long-lasting covering, polycarbonate is a top choice due to its resilience against wear and tear.
Light Transmission: Evaluate the light requirements of your plants. Polyethylene and EVA offer excellent light transmission, while PVC and polycarbonate may diffuse light more evenly.
Budget: Your budget is a crucial factor. Polyethylene is the most cost-effective option, while polycarbonate is pricier but offers better long-term value.
Insulation: For year-round growing or in colder climates, materials like polycarbonate or double-layered polyethylene with an inflated layer may provide better insulation.
UV Resistance: If your greenhouse will be exposed to intense sunlight, choose materials specifically designed to resist UV degradation.
In conclusion, the choice of plastic material for your greenhouse covering depends on various factors such as climate, budget, and the specific needs of your plants.
Preparing the Greenhouse Structure
A. Ensuring a sturdy and properly constructed greenhouse frame
Before attaching plastic to your greenhouse, having a solid and well-constructed frame is crucial.
The structural integrity of your greenhouse will impact the effectiveness of the covering. Here’s what you need to consider:
Frame Material: Common materials for greenhouse frames include galvanized steel, aluminum, and wood. Ensure the frame is in good condition and free from rust or rot.
Frame Strength: Assess the frame’s strength and stability. It should be able to withstand wind, snow loads, and other environmental factors common to your region.
Alignment: Ensure that the frame is properly aligned and leveled. An uneven frame can lead to difficulties when attaching and securing the plastic covering.
Anchor Points: Check that the frame has suitable anchor points or attachment locations for the plastic. These attachment points should be evenly spaced to distribute tension.
B. Cleaning and inspecting the greenhouse structure before attaching plastic
Cleaning: Thoroughly clean the entire greenhouse structure, including the frame and any support beams. Remove dirt, debris, and any old or damaged coverings.
Inspecting Joints and Fasteners: Inspect all joints, fasteners, and connections within the frame. Tighten or replace any loose or corroded parts to ensure structural integrity.
Check for Damage: Look for signs of wear and tear, such as rust or wood rot. Address any damage promptly to prevent further deterioration.
Sealing Gaps: Seal any gaps or openings in the frame that may allow drafts or pests to enter. Proper sealing improves insulation and maintains a controlled environment.
Ensuring that your greenhouse frame is sturdy, clean, and well-maintained creates a solid foundation for attaching the plastic covering.
A properly prepared structure will not only make the attachment process smoother but also contribute to the longevity and efficiency of your greenhouse.
How to Attach Plastic to Greenhouse – Step By Step Guidelines
Tools and Materials Required
Having the correct tools and materials is vital for attaching greenhouse plastic successfully. It ensures a secure and long-lasting covering that protects your plants and maintains a controlled growing environment.
When attaching plastic to your greenhouse, you’ll need specific tools to ensure a secure and successful attachment:
Greenhouse Poly Clips: These are essential for securing the plastic film to the greenhouse frame. The number you need will depend on the size of your greenhouse.
Wiggle Wire System: An alternative to poly clips, this system provides a secure and uniform plastic attachment to the frame.
Base or Channel: To hold the bottom edge of the plastic in place and prevent drafts, you’ll need a base or channel that fits your greenhouse frame.
Staple Gun (Optional): Some growers use a staple gun to fasten the plastic, but it’s not recommended as it can damage the plastic.
Ladders or Scaffolding: Having the correct tools and materials is vital for attaching greenhouse plastic successfully.
Utility Knife or Scissors: These are necessary for trimming and cutting the plastic to fit your greenhouse frame.
Measuring Tape: To ensure accurate sizing and alignment of the plastic covering.
Recommended materials for a secure and long-lasting attachment
Greenhouse-Grade Polyethylene Plastic: Choose a high-quality, UV-resistant polyethylene plastic designed for greenhouse use. The thickness of the plastic will vary based on your climate and insulation needs.
Screws and Fasteners (if needed): Depending on your specific greenhouse frame, you may require screws and fasteners to securely secure the base or channel to the frame.
Cleaning Supplies: Ensure you have cleaning materials like soap and water to clean the frame before attachment.
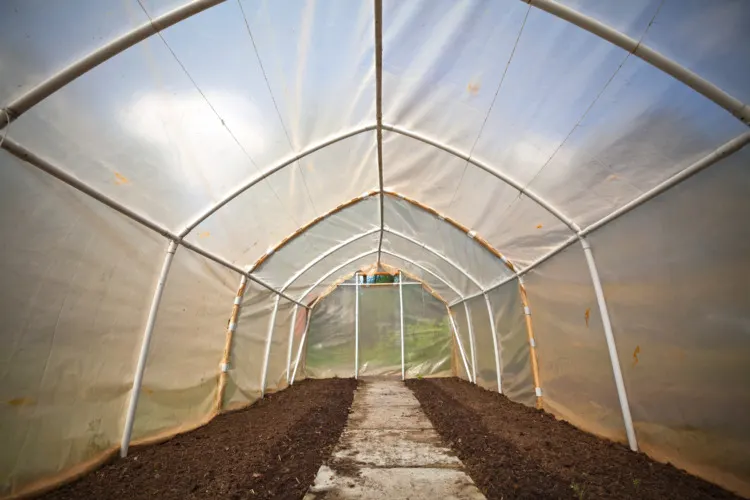
Step-by-Step Guide to Attaching Plastic to a Greenhouse
A. Preparing and measuring the plastic sheet
Measure the dimensions of your greenhouse frame carefully to determine the plastic sheet size needed.
Unroll the greenhouse-grade polyethylene plastic and cut it to the required size, leaving a little extra for overhang.
B. Securing the plastic to end walls and side frames
Begin at one end wall of the greenhouse. Attach the plastic to the end wall frame using greenhouse poly clips or a wiggle wire system.
Pull the plastic taut horizontally and secure it to the side frames using the same clips or wire system.
Repeat this process on the opposite end wall and side frames, ensuring the plastic is evenly stretched and secured.
C. Stretching and fastening the plastic to the greenhouse structure
- Work your way from one end of the greenhouse to the other, gradually pulling the plastic vertically and horizontally as you go.
- Use poly clips or the wiggle wire system to securely fasten the plastic to the greenhouse frame, ensuring it remains taut.
- Trim any excess plastic along the edges for a neat appearance.
D. Creating ventilation and access points in the plastic covering
- To provide ventilation, cut out plastic sections near the top or sides of the greenhouse, depending on your ventilation needs.
- Install automatic vent openers or manually adjust flaps to regulate temperature and airflow.
- Create roll-up sides or secure zippers as needed in your greenhouse for access points.
Following these instructions step by step will help you attach plastic to your greenhouse effectively. Proper installation ensures that your greenhouse provides an optimal environment for plant growth while maintaining structural integrity.
Tips for Properly Securing and Maintaining Plastic Covering
A. Regularly checking for any tears, holes, or loose attachments
- Inspect your greenhouse plastic regularly, ideally at least once a month, for any tears, holes, or loose attachments.
- Repair small tears promptly using greenhouse repair tape or patches to prevent further damage.
- Tighten or replace any loose attachments, such as poly clips or wiggle wire, to maintain a secure covering.
B. Properly insulating and sealing the seams to prevent air leaks
- Ensure that seams, where pieces of plastic meet, are securely sealed using greenhouse repair tape or adhesive.
- Properly insulate the greenhouse to prevent air leaks that can compromise temperature control.
- Check for gaps or openings around doors, vents, and access points, and seal them with weather-stripping or appropriate sealants.
C. Repairing or replacing damaged plastic as needed
- If you discover larger tears or significant damage, address them promptly to maintain an effective greenhouse environment.
- Depending on the extent of damage, you may need to patch the damaged area or consider replacing the entire plastic covering.
- Keep spare greenhouse plastic on hand to ensure quick replacement when needed.
Ultimately, Regular inspections and timely repairs are key to the ongoing success of your greenhouse.
Other Considerations for Successful Plastic Attachment
A. Weatherproofing techniques for extreme weather conditions
In places with extreme weather, consider adding extra support beams or bracing to strengthen your greenhouse.
Install hail netting or shade cloth to protect the plastic covering from hail or excessive sunlight, which can cause damage.
B. Additional methods to prolong the lifespan of the plastic covering
- Apply a UV-resistant coating to the exterior surface of the plastic to extend its lifespan by protecting it from sun damage.
- Consider using double-layered plastic with an inflated layer for better insulation and durability.
C. Best practices for optimal light transmission and temperature control
- Clean the inside and outside of the plastic covering regularly to maximize light transmission.
- Use reflective materials or whitewash on the greenhouse interior to distribute light evenly and prevent overheating.
- Install shade cloth or adjustable shading systems to control light levels and reduce excessive heat during the summer months.
So, these considerations are essential for achieving successful plastic attachment in a greenhouse.
FAQs
What type of plastic should I use for my greenhouse cover?
It’s best to use greenhouse-grade polyethylene plastic, which is UV-resistant and designed for this purpose.
How do I secure the plastic to the greenhouse frame?
You can use specialized greenhouse poly clips or wiggle wire systems to attach the plastic to the frame securely.
Should I stretch the plastic tightly when attaching it to the greenhouse?
Yes, it’s important to stretch the plastic as tightly as possible to prevent sagging and ensure good insulation.
Do I need to use a base or channel to attach the plastic at the bottom of the greenhouse?
Yes, using a base or channel at the bottom of the greenhouse is essential to securely attach the plastic covering and prevent drafts.
Can I use staples or nails to attach the plastic to the frame?
No, it’s not recommended to use staples or nails to attach the plastic to the frame, as they can damage the plastic and compromise the seal.
What’s the purpose of adding a layer of inflated plastic inside the greenhouse?
An inflated inner layer of plastic called a double-layer system, provides better insulation by creating an air buffer between the layers.
Should I use a professional installer to attach the plastic to my greenhouse?
While it’s not always necessary, hiring a professional installer can ensure a secure and tight fit for your greenhouse plastic if you are unsure about the process.
How often should I replace the plastic cover on my greenhouse?
Greenhouse plastic typically lasts 3-5 years but may need replacement sooner if it becomes damaged or loses its transparency.
Can I reuse the old plastic when replacing it in my greenhouse?
Reusing old plastic is not recommended, as it may have deteriorated and lost its effectiveness.
Is it essential to have proper ventilation when using plastic in a greenhouse?
Yes, it is essential to have proper ventilation when using plastic in a greenhouse to regulate temperature and humidity levels, ensuring a healthy environment for plant growth.
Conclusion
In conclusion, correctly attaching plastic to a greenhouse is crucial for its success. It is vital in providing insulation, temperature control, and protection against external elements.
Properly securing the plastic ensures an efficient greenhouse environment and reduces the risk of damage.
To maintain the plastic covering, regularly inspect and repair any damages, clean it periodically, and consider using specialized UV-protected plastic for longer durability.
Properly attaching and maintaining the plastic covering increases the overall effectiveness and longevity of the greenhouse structure.