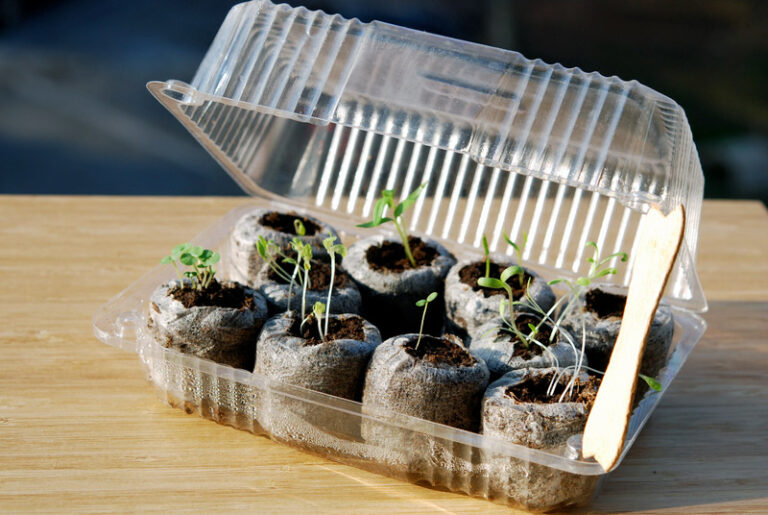
The DIY plastic bottle mini greenhouse offers an eco-friendly and simple way to repurpose plastic bottles for nurturing plants. Gather clean, label-free plastic bottles and cut them around the midpoint using scissors or a craft knife. Remove the bottle caps and fill the bottom halves with soil, leaving adequate space for planting seeds or small plants. Once planted, invert the top halves and place them over the bottom halves, forming a dome to create a greenhouse effect. Ensure a snug fit by pressing the edges firmly into the soil. Regularly water the soil without overdoing it and position the mini greenhouses in a sunny spot for optimal plant growth.
As the plants grow, open the greenhouse occasionally for air circulation, and consider transferring them to larger containers when they outgrow the space. This project not only repurposes plastic waste but also provides a controlled environment for starting seeds or cultivating small plants indoors.
What materials are needed for a DIY Plastic Bottle Mini Greenhouse?
Creating a DIY plastic bottle mini greenhouse is a great way to repurpose materials and start seedlings or protect small plants.
Materials
- Plastic Bottles: Choose clear plastic bottles like soda bottles or water bottles. The size will depend on how big you want your mini greenhouse to be.
- Scissors or Box Cutter: For cutting the bottles.
- Marker or Pen: To mark cutting lines on the bottles.
- Soil and Seeds/Plants: For planting inside the greenhouse.
- Tape or hot glue gun: For securing the bottles together.
- Wooden skewers or sticks: To support larger bottles or to create hinges for easy opening.
- Tray or container: To place the mini greenhouses in and catch any water drips.
Steps
Prepare the Bottles
Wash and dry the bottles thoroughly. Remove any labels. Decide how big you want your greenhouse to be and cut the bottles accordingly. For example, you might cut the top off a larger bottle and the bottom off a smaller bottle.
Create Planting Space
For the bottom half (the part that will hold the soil), consider cutting a few small drainage holes in the bottom to prevent waterlogging. If you’re using the top part of the bottle as a cover, leave it intact.
Assemble the Mini Greenhouse
Place the bottom part of the bottle upside down (like a dome) over the soil in a tray or container. If using multiple bottles, you might want to tape or hot glue them together to create a larger greenhouse structure.
Optional Additions
You can insert wooden skewers or sticks into the soil and then use these as a hinge to attach the top part of the bottle to create a lid that can be opened for ventilation.
Planting
Fill the bottom part with soil and plant your seeds or small plants. Water them appropriately.
Placement
Place the greenhouse in a location that gets adequate sunlight for your plants.
The greenhouse will create a warm, humid environment for your plants, promoting growth. Remember to monitor the moisture levels inside and provide ventilation as needed to prevent excessive heat buildup or condensation.
How to create a Plastic Bottle Mini Greenhouse in simple steps?
By following these detailed steps, you can effectively create a Plastic Bottle Mini Greenhouse and maintain an optimal environment for nurturing plants indoors while using recycled materials.
Preparation
Collecting and Cleaning Plastic Bottles
Gather plastic bottles of the same size, like 2-liter soda bottles, and remove any labels and caps. Thoroughly wash and rinse the bottles to ensure they’re clean and free from any residues.
Cutting the Bottles
Determining the Cutting Point
Decide on the height for your mini greenhouse, typically around the bottle’s midpoint. Mark a clear line around the bottle using a marker or pen for guidance.
Marking and Cutting the Bottles
Carefully cut along the marked line using scissors or a craft knife. Exercise caution while cutting, ensuring a smooth, even cut without jagged edges. (Adult supervision is recommended.)
Assembling the Mini Greenhouse
Filling the Bottom Half with Soil
Fill the bottom half of the bottle with a quality potting mix, leaving adequate space for planting seeds or small plants. Ensure the soil is loose, well-draining, and suitable for the chosen plants.
Planting Seeds or Small Plants
Carefully sow seeds or transplant small plants into the soil within the bottom half of the bottle. Follow recommended planting depths and spacing for optimal growth.
Attaching the Top Half as a Dome
Invert the top half of the bottle (without the cap) and place it over the bottom half, creating a dome or greenhouse structure.
Gently press the edges of the top and bottom halves into the soil to secure them together.
Securing the Halves Together
Ensure a snug fit between the two bottle halves to create a closed environment conducive to plant growth.
Firmly press the edges into the soil to prevent any gaps that might affect the greenhouse effect.
Maintenance and Care
Watering the Plants
Water the soil lightly, ensuring it remains consistently moist but not waterlogged. Use a watering can or sprayer to avoid disturbing the soil and seeds/plants.
Placement in a Sunny Location
Position the mini greenhouse in a spot that receives adequate sunlight for the specific plants being grown. Ensure the plants get the required amount of sunlight for healthy growth.
Monitoring Plant Growth and Adjusting the Greenhouse
Regularly check the plants for growth and adjust the greenhouse if needed. Open the greenhouse occasionally for air circulation, especially as plants grow taller.
Transitioning Plants as They Grow
As the plants outgrow the mini greenhouse, consider transferring them to larger pots or garden beds to accommodate their growth. Avoid overcrowding within the mini greenhouse to prevent stunted growth.
FAQ’s
Do cheap plastic greenhouses work?
Cheap plastic greenhouses can work to some extent, but their durability and effectiveness may vary. They might not offer the same level of insulation or longevity as higher-quality options.
How can I make a small greenhouse?
You can make a small greenhouse using clear plastic bottles, cutting them, and placing the bottom part upside down as a planting base with the top part acting as a cover. It’s a simple DIY project.
What is a cheaper alternative to a greenhouse?
A cheaper alternative to a greenhouse could be a cold frame, which is essentially a low, transparent structure built with materials like reclaimed wood and old windows or plastic sheets.
What are the disadvantages of plastic greenhouses?
Disadvantages of plastic greenhouses include vulnerability to damage from strong winds, potential deterioration from UV exposure over time, and limitations in insulation compared to glass.
How to make a 2-liter bottle greenhouse?
To make a 2-liter bottle greenhouse, cut the bottle into two parts, use the bottom for planting, and the top as a cover. Create drainage holes, fill with soil, plant seeds, and place it in a sunny spot.
Is PVC plastic good for a greenhouse?
PVC plastic can be used for a greenhouse frame due to its affordability and durability, but it might not be as environmentally friendly as other options. It can release toxic chemicals when exposed to high temperatures.
Final Words
In conclusion, making a plastic bottle mini greenhouse is easy and fun. All you need are clean plastic bottles, scissors, soil, and seeds or small plants. First, cut a bottle into two parts—a bottom to hold the soil and a top to act as a cover. Make small holes in the bottom for drainage. Then, place the bottom upside down in a tray and fill it with soil. Plant your seeds or small plants and keep them in a sunny spot.
Remember to water them properly. This mini greenhouse creates a cozy environment for plants to grow. Keep an eye on moisture levels and ventilation to help your plants thrive. It’s a simple way to repurpose bottles and start a little garden at home!