Growing plants indoors is awesome! It lets you grow all kinds of plants, like herbs and flowers, anytime. You’re not limited by the weather outside. There are cool benefits:
- All-Year Growing: You can grow plants all year round, not just in certain seasons. That means you get fresh produce whenever you want.
- Controlled Environment: Indoors, you have control over things like temperature and light. This makes your plants happy and healthy.
- No Pests and Diseases: There are fewer bugs and diseases inside. Your plants are safer and more protected.
- Save Space: Even if you don’t have a big backyard, you can still grow lots of plants indoors. It’s like a green oasis inside your home.
- Easy Access: You can have fresh herbs, veggies, or flowers right at home. It’s super convenient!
Now, let’s talk about making your own tent. It’s a fun project and doesn’t have to cost much. Here’s what you’ll need:
Materials and Tools:
- PVC pipes or metal tubes
- Connectors
- Reflective material (like Mylar)
- Zip ties or duct tape
- Fabric for the tent cover
- Hanging hooks
- Ventilation stuff (fan, ducting, carbon filter)
- Grow lights
Building the Frame:
Use PVC pipes or metal tubes to make a strong frame. Connect them well so it doesn’t wobble.
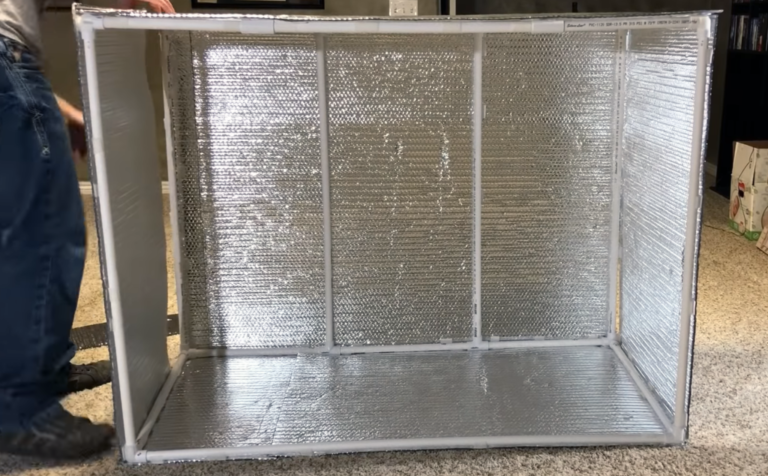
Covering Your Tent:
Wrap the frame with reflective material. This helps your plants get more light and keeps the light inside.
Use zip ties or duct tape to make sure it’s tight, and light can’t sneak out.
Setting Up Ventilation:
Make sure your plants get fresh air. Use a fan and ducting to keep the air moving. If needed, add a carbon filter.
Lights, Camera, Action:
Place your grow lights at the correct height. This makes sure your plants get the light they require.
Make sure the lights can be moved up or down as your plants grow.
Seal the Deal:
Check for any gaps and seal them up. You want to keep your plant space just right.
Fix any spots where light might leak out.
By doing this, you’re creating your own cool grow tent. It’s budget-friendly and perfect for growing your indoor garden.
Planning Your Homemade Grow Tent
Assessing Space Requirements and Available Resources
Determine Space Availability:
Measure the area where you plan to set up the grow tent. Consider height, width, and depth to ensure the tent fits comfortably.
Ventilation:
Plan for proper airflow and ventilation. Ensure that there is enough space for fans, ducting, and exhaust systems.
Lighting Considerations:
Calculate the amount of light your plants will need and choose an appropriate grow light. Ensure that the space allows for proper light coverage and height adjustment.
Electricity Availability:
Check the availability of power outlets and make sure they can handle the electrical load of your grow lights and other equipment.
Access and Maintenance:
Plan for easy access to your grow tent for maintenance tasks like watering, pruning, and pest control. Ensure there is enough space around the tent to work comfortably.
Climate Control:
Think about how hot or humid it usually is in the place you picked. Choose a spot where you can easily manage these conditions.
Setting a Budget for the Project
Equipment Costs:
List all the necessary equipment, including grow lights, fans, ventilation systems, reflective materials, and temperature/humidity control devices. Research and estimate their costs.
Building Materials:
Calculate the cost of materials needed for constructing the frame of the grow tent, such as PVC pipes, connectors, and reflective materials.
Energy Costs:
Estimate the ongoing operational costs, including electricity for grow lights and any other equipment.
Lighting Requirements:
Match the lighting needs of your chosen plants with the capabilities of your grow lights. Different plants may have different light requirements during various growth stages.
Materials Needed
List of Essential Materials for Building a Homemade Grow Tent
Frame:
PVC pipes (or metal pipes)
Connectors (corner connectors, T-connectors, and couplings)
Covering/Enclosure:
Reflective material (Mylar, Panda film, or emergency blankets)
Flooring:
Water-resistant and easy-to-clean material (plastic sheeting or vinyl flooring)
Ventilation:
Inline fan
Ducting
Carbon filter
Ventilation holes or adjustable vents
Lighting:
Grow lights (LED, HID, or fluorescent)
Light hangers or adjustable pulleys
Temperature and Humidity Control:
- Thermometer and hygrometer
- Heater or air conditioner (depending on climate)
- Humidifier or dehumidifier
Electrical Components:
Power strips
Timers for lights and fans
Miscellaneous:
Zip ties or Velcro straps for securing equipment
Duct tape
Hanging hooks or shelves for organizing tools and supplies
Alternative and Budget-Friendly Options for Each Component
Frame:
PVC pipes are cost-effective, but metal pipes or wooden frames are durable alternatives.
Covering/Enclosure:
Emergency blankets are budget-friendly, but Panda film or white-painted walls can also reflect light effectively.
Flooring:
Plastic sheeting is affordable, but reclaimed linoleum or vinyl remnants can be budget-friendly alternatives.
Ventilation:
Affordable inline fans and ducting are available, and DIY carbon filters using activated charcoal and a fan can be a budget-friendly option.
Lighting:
LED grow lights are energy-efficient and cost-effective over the long term. T5 fluorescent lights are a budget-friendly option for smaller setups.
Temperature and Humidity Control:
Using natural ventilation, like strategically placed intake and exhaust vents, can be a budget-friendly alternative. Alternatively, second-hand heaters or fans may be available at lower costs.
Electrical Components:
Basic power strips and manual timers are budget-friendly, but smart plugs and programmable digital timers provide additional functionality.
Miscellaneous:
Reusable cable ties are a sustainable alternative to traditional plastic zip ties. Opt for biodegradable duct tape when possible.
Sustainability Considerations in Material Choices
Frame:
Select materials with minimal environmental impact, such as PVC pipes composed of recycled content or metal pipes derived from sustainable sources.
Covering/Enclosure:
Opt for reflective materials with minimal environmental impact, and consider reusable options for future growth.
Flooring:
Select materials that are recyclable or made from sustainable sources. Reclaimed or recycled materials can be environmentally friendly choices.
Ventilation:
Look for energy-efficient inline fans and consider DIY carbon filters using sustainable materials.
Lighting:
LED grow lights are energy-efficient and have a longer lifespan, making them a more sustainable choice over traditional lighting options.
Temperature and Humidity Control:
Choose energy-efficient heaters, air conditioners, and humidifiers/dehumidifiers. Look for products with eco-friendly certifications.
Electrical Components:
Opt for energy-efficient timers and smart plugs. Consider products with energy-saving features and certifications.
Miscellaneous:
Choose reusable and eco-friendly options for fastening materials, such as reusable cable ties and biodegradable duct tape.
By incorporating alternative and sustainable materials into your homemade grow tent, you can reduce the environmental impact of your indoor gardening setup.
Constructing the Frame
Step-by-Step Instructions for Building a Sturdy Frame
Gather Materials:
Collect PVC pipes, connectors (corner, T-connectors, and couplings), a measuring tape, and a saw.
Measure and Cut PVC Pipes:
Measure the dimensions of your grow tent space and cut the PVC pipes to the appropriate lengths using a saw.
Assemble the Base:
Connect the PVC pipes using corner connectors to create the base of the frame. Ensure the corners are square for stability.
Build Vertical Supports:
Connect vertical PVC pipes to the corners of the base using T-connectors. This forms the vertical supports for the frame.
Add Horizontal Supports:
Connect additional PVC pipes horizontally between the vertical supports using T-connectors to enhance stability.
Create the Top Frame:
Connect the vertical supports with horizontal pipes to form the top frame of the tent. This structure should resemble a rectangular cube.
Stabilize Corners:
Use additional PVC pipes and couplings to reinforce the corners and provide extra stability.
Secure Joints:
Secure all joints with PVC glue to ensure a strong and stable frame.
Tips for Ensuring Stability and Adaptability to Various Spaces
Choose a Stable Base:
If placing the grow tent on a soft surface, consider adding a stable base using plywood or similar material to distribute weight evenly.
Brace Corners and Joints:
Use additional crossbars or braces at the corners and key joints to prevent wobbling and enhance stability.
Adjustable Design:
Design the frame to be adjustable in size to accommodate different grow spaces. This can be achieved by using telescopic PVC pipes or designing the frame to be easily disassembled and reassembled.
Consider Ceiling Height:
Ensure that the height of the frame allows for proper distance between the plants and the grow lights, taking into account any height adjustments needed for the lights.
Use Sturdy Connectors:
Invest in high-quality connectors to ensure a stable and durable frame. Consider metal connectors for added strength.
Anchor the Frame:
If possible, anchor the frame to the floor or walls for additional stability, especially if the grow tent is placed in a location with high foot traffic.
Ideas for Recycling or Repurposing Materials for the Frame
Wooden Frame:
Repurpose old wooden pallets or discarded lumber to create a sturdy frame. Ensure the wood is treated to resist moisture and pests.
Metal Frame:
Use discarded metal pipes or conduits to construct a robust frame. Consider salvaging materials from old furniture or construction sites.
Upcycled Furniture:
Repurpose old shelving units, bookshelves, or wardrobe frames to create a unique and adaptable grow tent frame.
Bamboo Frame:
Bamboo is a sustainable and readily available material. Create a frame using bamboo poles, ensuring they are securely fastened.
Reclaimed Materials:
Explore salvage yards for materials like metal pipes, wooden beams, or other structural elements that can be repurposed for building a grow tent frame.
Plumbing Materials:
Repurpose copper pipes or alternative plumbing materials to construct a robust and distinctive frame, ensuring thorough cleaning before use.
When building the frame for your DIY grow tent, ingenuity, and resourcefulness can yield unique and sustainable solutions.
Opting for the repurposing or recycling of materials not only lowers costs but also promotes environmentally friendly practices.
Choosing the Covering
Overview of Different Materials for the Tent Covering
Mylar:
Reflective, durable, and helps distribute light evenly.
Commonly used in commercial grow tents.
It may have a higher upfront cost.
Panda Film:
Black on one side and white on the other, providing reflective and light-blocking properties.
More affordable than Mylar.
Prone to wear and tear over time.
Emergency Blankets:
Reflective and budget-friendly.
Lightweight and easy to install.
It may not be as durable as other options.
Reflective White Paint:
Applied directly to walls for a reflective surface.
Budget-friendly option.
Requires proper surface preparation and multiple coats.
Blackout Fabric:
Light-tight and often used for light deprivation.
It Might be weighty and could need extra support.
Provides excellent light control.
Pros and Cons of Each Material
Mylar:
Pros:
High reflectivity for efficient light distribution.
Durable and long-lasting.
Cons:
Higher initial cost.
May develop pinhole leaks over time.
Panda Film:
Pros:
Reflective and cost-effective.
Provides light-blocking capabilities.
Cons:
Prone to punctures and tears.
It Might break down over time because of exposure to UV rays.
Emergency Blankets:
Pros:
Budget-friendly.
Lightweight and easy to install.
Cons:
Less durable compared to other options.
It may have seams that affect reflectivity.
Reflective White Paint:
Pros:
Budget-friendly.
No additional material to install.
Cons:
It requires surface preparation.
It may provide more reflection than other materials.
Blackout Fabric:
Pros:
Light-tight for precise light control.
Durable and long-lasting.
Cons:
Heavier than other options, requiring additional support.
Limited in terms of light reflection.
Factors to Consider When Selecting the Covering for Your Homemade Grow Tent
Light Reflectivity:
Choose a material that maximizes light reflection to ensure optimal plant growth.
Durability:
Consider the material’s durability and ability to endure wear and tear over an extended timeframe.
Light-Tightness:
Ensure the covering is light-tight for light-sensitive plants or during specific growth stages to prevent light leaks.
Budget:
Evaluate your budget constraints and choose a cover that aligns with your financial resources.
Installation Ease:
Certain materials might be simpler to install than others. Think about your DIY skills and how complicated the installation process is.
Adaptability:
Choose a covering that can be easily adapted to the frame and size of your grow tent.
Climate Considerations:
Consider the climate of your location and whether the covering provides insulation against temperature fluctuations.
Aesthetics:
While not crucial for plant growth, consider the visual appeal of the covering, especially if the grow tent is in a visible or shared space.
Ventilation Solutions
Importance of Proper Ventilation in a Homemade Grow Tent
Oxygen Exchange:
Proper ventilation ensures a continuous exchange of fresh air and carbon dioxide, which is crucial for photosynthesis and plant growth.
Temperature Control:
Good ventilation keeps the temperature in check by getting rid of extra heat produced by grow lights and other equipment.
Humidity Management:
Ventilation aids in controlling humidity levels, preventing issues such as mold, mildew, and excess moisture that can harm plants.
Odor Control:
Adequate airflow helps control and minimize odors produced by plants, especially during the flowering stage.
Prevention of Pests and Diseases:
Good ventilation reduces the risk of pests and diseases by maintaining a clean and well-ventilated environment.
DIY Options for Installing Fans and Airflow Systems
Inline Fans:
Install an inline fan with ducting to facilitate air exchange. Place the fan near the top of the tent to remove warm air effectively.
Exhaust and Intake System:
Set up an exhaust system using an inline fan connected to carbon filters to remove odors. Pair it with an intake fan or passive vents to bring fresh air.
DIY Carbon Filter:
Create a budget-friendly carbon filter using a large, sealed container filled with activated charcoal. Attach an exhaust fan to pull air through the filter.
Oscillating Fans:
Install oscillating fans within the grow tent to enhance air circulation and prevent the formation of stagnant air pockets.
Passive Ventilation:
Create passive ventilation by incorporating adjustable vents or flaps in the grow tent. This allows for natural air exchange without the need for additional fans.
Temperature-Activated Ventilation:
Implement a thermostat-controlled system that activates fans when temperatures exceed a set threshold.
Air Circulation Patterns:
Strategically position fans to create gentle air circulation patterns, avoiding direct airflow on plants to prevent stress.
Tips for Maintaining Optimal Temperature and Humidity Levels
Temperature Management:
Monitor and control the temperature inside the grow tent by adjusting the speed of fans, using exhaust systems, and considering additional cooling methods such as air conditioning or heat-resistant materials.
Humidity Control:
Use a humidifier to increase humidity or a dehumidifier to reduce excess moisture. Aim for the ideal humidity levels for the specific plants you are growing.
Vapor Barriers:
Consider using reflective materials as vapor barriers to help maintain consistent temperature and humidity levels within the grow tent.
Timed Ventilation:
Implement timed ventilation cycles to simulate natural day-night temperature and humidity fluctuations, promoting healthy plant growth.
Monitoring Equipment:
Use temperature and humidity monitors to keep track of environmental conditions. This information will help you adjust ventilation settings as needed.
Airflow Optimization:
Regularly assess the positioning of fans and vents to ensure optimal air circulation and distribution throughout the entire grow space.
Lighting on a Budget
Understanding the Role of Lighting in Indoor Gardening Light
Spectrum:
Various stages of plant growth necessitate different light spectrums. Understanding the light needs during each phase (vegetative and flowering) is crucial for optimal results.
Intensity and Duration:
Light intensity and the duration of light exposure (photoperiod) impact plant health, flowering, and overall productivity.
Budget-Friendly Options for DIY Lighting Setups
LED Grow Lights:
Budget-friendly LED grow lights are energy-efficient and suitable for small to medium-sized grow setups. Look for full-spectrum LEDs for comprehensive light coverage.
Compact Fluorescent Lights (CFLs):
CFL bulbs are an affordable option for smaller spaces or seedlings. They are energy-efficient and emit lower heat, making them suitable for proximity to plants.
T5 Fluorescent Lights:
T5 fixtures provide a good balance of efficiency and affordability. They are suitable for seedlings and smaller plants during the vegetative stage.
DIY LED Strip Lights:
Craft personalized LED strip lights by affixing LED strips to a surface. This offers versatility in design and placement, all while maintaining a cost-effective approach.
Reflector Lamps:
Utilize simple reflector lamps with compact fluorescent or LED bulbs. This setup is economical and can be easily adjusted based on plant growth.
Adjustable Desk Lamps:
Repurpose adjustable desk lamps with energy-efficient bulbs for a cost-effective and adaptable lighting solution.
Spiral CFL Bulbs:
Spiral CFL bulbs are readily available and can be used in standard light fixtures. They are a cost-effective option for smaller grow spaces.
Tips for Positioning and Adjusting Lights Within the Homemade Grow Tent
Light Distance:
Modify the height of the lights according to your plant’s specific needs. Various growth stages may require different distances to avoid issues such as light burn or inadequate exposure.
Light Angle:
Angle the lights to cover the entire canopy and avoid shadows. This ensures even light distribution and maximizes photosynthetic activity.
Light Rotation:
Rotate plants regularly to expose all sides to light. Adjust the light angle accordingly to promote uniform growth.
Light Schedule:
Establish a consistent lighting schedule that caters to your plant’s specific needs, with approximately 18 hours of light during the vegetative stage and 12 hours during the flowering stage.
Assess Plant Response:
Regularly observe your plants for indications of stress or insufficient light. Adjust the lighting configuration as needed to address any
emerging issues.
Place reflective materials around the grow tent to maximize light absorption. Mylar or white-painted walls can enhance light distribution within the space.
Energy-Efficient Practices:
Use timers to automate the light schedule and promote energy efficiency. Turn off lights during the dark period to allow plants to rest.
Light-proofing and Sealing
Importance of Preventing Light Leaks for Light-Sensitive Plants
Photoperiod Sensitivity:
Some plants, especially those in the flowering stage, are sensitive to changes in the light cycle. Light leaks during the dark period can disrupt their natural growth patterns.
Stress Reduction:
Light-sensitive plants may become stressed or hermaphroditic if exposed to light during their designated dark hours. This can negatively impact yields and overall plant health.
Optimal Growth Conditions:
Maintaining a strict light schedule and preventing light leaks helps create consistent and optimal growth conditions, ensuring plants receive the right signals for various growth stages.
DIY Methods for Ensuring Light-Tightness
Seal Tent Joints:
Use lightproof tape, Velcro, or other sealing materials to secure joints and seams in the grow tent. Ensure there are no gaps where light can escape.
Cover Zippers:
Attach light-proof covers or flaps over zippers to prevent light leaks in areas where the tent opens or closes.
Cover Vents and Ducts:
Use light-proof materials to cover ventilation holes, ducts, and any other openings. Secure them tightly to prevent light from escaping.
Check for Pinholes:
Inspect the tent covering for any pinholes or areas where light might penetrate. Patch these areas using lightproof tape or fabric.
Install Light Traps:
Create light traps using materials like foam board or heavy fabric to block light at corners or edges where leaks are likely to occur.
Double-Layer the Covering:
Consider using an additional layer of covering material to enhance light-proofing. This can be especially effective for lightweight materials prone to light leaks.
Blackout Curtains or Fabric:
Hang blackout curtains or attach blackout fabric to the interior of the tent to create an additional barrier against light leaks.
Using Affordable Reflective Materials to Maximize Light Distribution
Mylar Sheets:
Attach reflective Mylar sheets to the interior walls of the grow tent to maximize light distribution. Ensure they are securely fastened and cover all surfaces.
White-Painted Walls:
Paint the tent’s interior walls with reflective white paint to enhance light distribution. This is a cost-effective method to improve the overall reflective properties of the space.
Emergency Blankets:
Affix emergency blankets to the interior surfaces for a budget-friendly and reflective solution. Ensure they are tightly sealed to prevent light leaks.
Reflective Tarp or Film:
Hang reflective tarps or films along the walls to increase the light intensity within the grow tent. These materials are often affordable and easy to install.
Reflective Tape:
Use reflective tape on the edges of surfaces, poles, or frames within the tent to redirect and maximize light exposure to plants.
DIY Reflective Panels:
Create reflective panels using foam board or reflective material attached to lightweight boards. Place these strategically to redirect light to shadowed areas.
Consider the Floor:
Cover the floor with a reflective material to ensure light bouncing from the bottom reaches lower foliage, promoting more uniform plant growth.
FAQs
What materials do I need to make a homemade grow tent?
You’ll need PVC pipes or a frame, a reflective covering (such as Mylar or Panda film), a durable flooring material, ventilation components (fans, ducting), and appropriate lighting (LED, CFL, or other options).
Can I use any space for a homemade grow tent?
Ideally, choose a space with proper dimensions, access to electricity, and the ability to control environmental factors like temperature and humidity.
How can I ensure my homemade grow tent is light-proof?
Seal joints with lightproof tape, cover zippers and vents, check for pinholes, and use blackout curtains or fabric to prevent light leaks.
What budget-friendly lighting options are suitable for a homemade grow tent?
LED grow lights, CFL bulbs, T5 fluorescent lights, and DIY LED strip lights are affordable options that provide adequate light for plant growth.
How important is ventilation in a homemade grow tent?
Ventilation is crucial for oxygen exchange, temperature control, humidity management, and prevention of odors. It contributes to a healthy and thriving indoor garden.
Can I use reflective materials to maximize light distribution on a budget?
Yes, materials like Mylar sheets, white-painted walls, emergency blankets, reflective tarps, and DIY reflective panels can effectively enhance light reflection within the tent.
Are there sustainable options for building a homemade grow tent?
Choose eco-friendly materials like recycled PVC, sustainable wood, or bamboo for the frame. Consider using reflective materials with minimal environmental impact.
How do I control temperature and humidity levels in my homemade grow tent?
Use a combination of ventilation, heaters, air conditioners, humidifiers, and dehumidifiers.
Can I repurpose materials for the frame of my homemade grow tent?
Yes, consider using reclaimed wood, metal pipes, or repurposed furniture to create a sturdy and sustainable frame.
What’s the ideal light schedule for plants in a homemade grow tent?
During the vegetative stage, aim for 18 hours of light and 6 hours of darkness. In the flowering stage, switch to 12 hours of light and 12 hours of darkness.
How do I avoid overloading electrical circuits in my homemade grow tent?
Calculate the total wattage of your lighting and equipment, and ensure your electrical circuits can handle the load. Consider using energy-efficient appliances and distribute the load across multiple circuits if needed.
Conclusion
In conclusion, planning and constructing a homemade grow tent involves carefully considering various factors, including space requirements, budget constraints, plant selection, and growth conditions.
Building a sturdy frame, choosing a suitable covering, providing proper ventilation, and optimizing lighting are essential steps for creating a successful indoor gardening environment.
With attention to detail, resourcefulness, and a commitment to maintaining optimal conditions, your homemade grow tent can offer a cost-effective and rewarding solution for cultivating healthy plants year-round.