If you’re into indoor gardening, a grow tent is your go-to for creating a perfect space for your plants. Here’s why it’s incredible:
- Perfect Conditions: With a grow tent, you can control the temperature and humidity just right. This helps your plants grow in the best possible way.
- Great Lighting: The inside of a grow tent reflects light, making sure all your plants get the same amount. This helps them grow healthy and strong.
- No Smells or Bugs: Grow tents keep smells inside and bugs outside. This keeps your plants safe and your space clean.
- Space Saver: Grow tents come in different sizes, so you can pick one that fits your space. They help you make the most of what you have for growing your plants.
- Private and Safe: If you want to keep your gardening private, a grow tent is perfect. It’s a discreet way to grow your plants without anyone noticing.
Planning Your Grow Tent
Creating a grow tent for indoor gardening involves setting up an enclosed space with controlled environmental conditions to support plant growth. Here’s a basic guide on how to make a simple DIY grow tent:
Assessing Space and Size Requirements:
Plant Count and Size: Determine the number of plants you intend to grow and their expected size at maturity. This will help you estimate the space needed.
Equipment Size: Consider the size of the grow lights, exhaust fan, and other equipment you plan to use. Ensure that the tent can accommodate these without crowding the plants.
Working Space: Leave enough room for you to access and care for your plants comfortably. Adequate space for maintenance tasks will make the growing process more manageable.
Selecting an Appropriate Location for the Grow Tent:
Light Accessibility: Choose a location with access to natural light or consider supplementing with artificial light. Proximity to windows can be beneficial, but ensure that the light cycle remains consistent.
Ventilation: Pick a spot where you can easily set up ventilation without causing disruptions. An area with good airflow can help regulate temperature and humidity.
Electrical Outlets: Ensure there are sufficient electrical outlets nearby for your grow lights, fans, and any other equipment you plan to use.
Temperature Control: Think about how hot or cold it usually is in the place you picked. Don’t choose really hot or really cold spots, as it can harm the plants’ growth.
Budget Considerations for Building a DIY Grow Tent:
Material Costs: Estimate the costs associated with building the frame, purchasing reflective materials, and acquiring the necessary equipment (lights, fans, etc.).
Energy Costs: Factor in the ongoing costs of electricity for running lights, fans, and other electrical components. Energy-efficient equipment may be cost-effective in the long run.
Ventilation and Filtration: Include costs for ventilation components, including fans, ducting, and filters. Investing in a quality carbon filter can help control odors.
Maintenance and Upkeep: Consider ongoing costs such as replacing bulbs, filters, or other consumables.
Contingency: Keep a budget for unexpected expenses or upgrades. It’s wise to have a little extra in case you need to adjust or improve your setup over time.
By carefully planning and assessing your space, size requirements, location, and budget considerations, you can create an efficient and cost-effective DIY grow tent that meets the needs of your plants and your cultivation goals.
Materials and Tools:
List of Essential Materials for Constructing a Grow Tent:
Frame Materials:
- PVC pipes or metal tubing
- Connectors for pipes/tubing
Covering:
- Plastic or Mylar film (reflective material)
Ventilation:
- Exhaust fan
- Carbon filter
- Ducting
- Ventilation holes
Lighting:
- LED or HID grow lights
- Timer for lights
Temperature and Humidity Control:
- Thermometer and hygrometer
Securing and Sealing:
- Zip ties or duct tape
Plant Containers:
- Fabric pots or containers
Recommended Tools for Assembly:
Cutting Tools:
- PVC or metal pipe cutter
- Scissors or utility knife for cutting plastic/Mylar
Fastening Tools:
- Screwdriver or drill (if using screws to secure connectors)
- Zip tie gun or pliers
Measuring Tools:
- Tape measure or ruler for accurate dimensions
Ventilation Installation:
- Hole saw or utility knife for creating ventilation holes
- Clamps for securing ducting
Lighting Installation:
- Hanging system or hooks for suspending grow lights
Eco-friendly and Cost-effective Alternatives for Certain Components:
Frame Materials:
Think about using old materials that have been used before or repurposed for the frame, like reclaimed wood or metal.
Bamboo can be an eco-friendly alternative to PVC or metal tubing.
Covering:
Reflective emergency blankets or reflective paint can be more environmentally friendly alternatives to Mylar film.
Consider using recycled or upcycled materials for covering.
Ventilation:
Opt for energy-efficient fans to reduce electricity consumption.
Reuse or repurpose materials for creating ventilation holes instead of purchasing additional components.
Lighting:
LED grow lights usually use less energy than regular HID lights, so they don’t use as much electricity.
Look for second-hand or refurbished grow lights to save costs and reduce waste.
Plant Containers:
Use fabric pots made from recycled materials, or choose reusable containers.
Consider repurposing containers from household items to minimize waste.
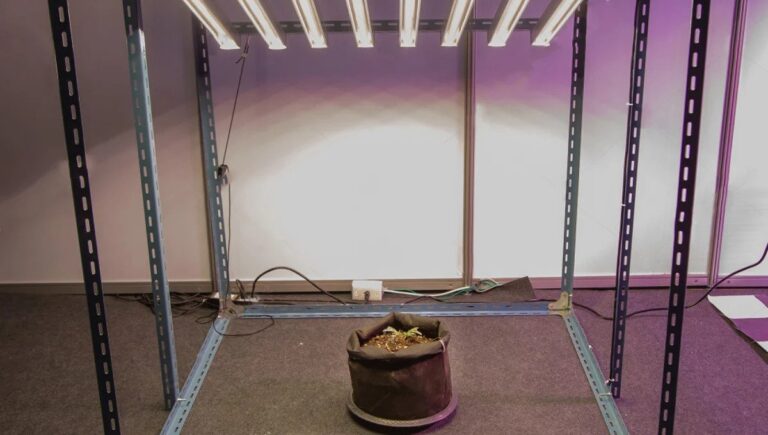
Building the Frame:
Step-by-step Instructions for Constructing the Frame:
Measure and Plan:
Determine the desired dimensions of your grow tent based on available space and the number of plants you intend to grow.
Mark your PVC pipes or metal tubing lengths according to your measurements.
Cut the Frame Materials:
Use a PVC or metal pipe cutter to cut the pipes/tubing to the measured lengths.
Ensure that all pieces are cut accurately to create a uniform and stable frame.
Connect the Frame:
Assemble the frame by connecting the cut pieces with appropriate connectors.
For PVC pipes, use PVC connectors; for metal tubing, use fittings designed for that material.
Follow your planned dimensions to create a rectangular or square frame.
Stability and Reinforcement:
To enhance stability, consider adding additional supports or braces at the corners.
Cross-braces can be added diagonally across the frame to prevent swaying or wobbling.
Tips on Ensuring Stability and Durability:
Choose Sturdy Materials:
Opt for high-quality PVC pipes or durable metal tubing to ensure the frame can support the weight of the covering, lights, and other equipment.
Secure Connectors Properly:
Ensure that connectors are securely attached to the pipes or tubing. Use screws or appropriate fasteners as needed to prevent disassembly.
Reinforce Corners:
Corners are critical points for stability. Reinforce them with additional connectors or braces to minimize movement.
Consider the Weight Load:
Account for the weight of the covering, lights, and equipment that will be hung from the frame. Ensure that the frame can support the anticipated load.
Test for Stability:
After constructing the frame, give it a gentle shake to test for stability. Make any necessary adjustments or reinforcements.
Options for Adjustable Frames to Accommodate Different Plant Sizes:
Telescoping Poles:
Use telescoping metal poles that can be adjusted to different heights. This allows you to change the height of your grow tent as your plants grow.
Modular Frame Design:
Make the frame in a modular way so you can add or take away parts as you want. This makes it easy to change things for different-sized plants and modify them however you need.
Adjustable Connectors:
Select connectors that allow for height adjustments. These may include sliding connectors or those with multiple connection points.
Hanging System:
Implement a hanging system for lights and other equipment that can be easily adjusted up or down. This way, you can adapt the height to the growth stage of your plants.
Choosing the Right Covering:
Overview of Various Grow Tent Covering Materials:
Plastic Sheeting:
Commonly used and cost-effective.
Comes in various thicknesses.
It may not be as reflective as other materials.
Mylar Film:
Highly reflective and enhances light distribution.
Durable and tear-resistant.
Often used in professional grow tents.
Panda Film (Black and White Poly):
Black on one side, white on the other.
The white side reflects light, while the black side prevents light leakage.
Provides a good balance between reflection and light absorption.
Emergency Blankets:
Reflective and affordable.
It is not as durable as Mylar and may tear easily.
Often used as a budget-friendly alternative.
Reflective Paint:
Applied directly to walls for reflective surfaces.
Permanent solution but requires careful application.
Ideal for smaller spaces or irregularly shaped areas.
Pros and Cons of Each Material:
Plastic Sheeting:
Pros: Affordable, readily available.
Cons: Limited reflectivity may degrade over time.
Mylar Film:
Pros: High reflectivity, durable.
Cons: Relatively more expensive, can be prone to creasing.
Panda Film:
Pros: Dual functionality, reasonably priced.
Cons: It may not be as reflective as Mylar.
Emergency Blankets:
Pros: Budget-friendly, reflective.
Cons: Less durable, may tear easily.
Reflective Paint:
Pros: Permanent solution, no risk of tearing.
Cons: Application can be tricky and not as reflective as some films.
Factors to Consider When Selecting the Covering for Your DIY Grow Tent:
Reflectivity:
Consider the reflective properties of the material to maximize light distribution. Mylar and reflective paints are known for high reflectivity.
Durability:
Evaluate the durability of the covering material. Mylar tends to be more durable than plastic sheeting or emergency blankets.
Light-proofing:
Ensure that the material is light-proof to prevent light leaks. Panda film, with its black and white sides, is designed to minimize light leakage.
Cost:
Factor in your budget when choosing a covering material. Plastic sheeting and emergency blankets are often more budget-friendly options.
Ease of Installation:
Consider how easy it is to install and work with the material. Reflective paints may require more careful application than simply draping plastic or Mylar.
Space and Size:
The size of your tent and available space may influence your choice. Reflective paints are suitable for smaller, irregularly shaped spaces, while films or sheets are more versatile for larger tents.
Ventilation and Airflow:
Importance of Proper Ventilation in a Grow Tent:
Temperature Regulation:
Proper ventilation helps regulate temperature by expelling hot air and introducing fresh, cooler air into the grow tent.
Humidity Control:
Adequate airflow assists in maintaining optimal humidity levels by preventing the buildup of excess moisture reducing the risk of mold and mildew.
CO2 Exchange:
Good ventilation ensures a steady exchange of carbon dioxide (CO2) and oxygen, which is crucial for photosynthesis and overall plant health.
Odor Control:
Ventilation, coupled with the use of carbon filters, helps control and eliminate odors produced by growing plants.
Prevention of Stagnant Air:
Air that doesn’t move can attract bugs and make plants sick. Good ventilation reduces the chance of these problems.
Installing Fans and Filters for Optimal Airflow:
Exhaust Fan:
Install an exhaust fan near the top of the grow tent to remove hot air and odors.
Choose a fan size appropriate for the volume of your Grow tent. A fan with adjustable speed settings provides flexibility.
Carbon Filter:
Put a carbon filter in line with the fan that pushes out air to get rid of smells. Make sure the filter matches the size of your fan.
Intake Fan:
Consider installing an intake fan or passive intake vents to bring in fresh air. This helps maintain positive air pressure inside the tent.
Fan Placement:
Position fans strategically to create uniform airflow. Oscillating fans can help distribute air throughout the entire growth space.
Ducting:
Connect the exhaust fan to the carbon filter with ducting and send the air outside the tent. Use clamps to ensure all connections are tight and do not let air escape.
Ventilation Holes:
Create ventilation holes near the bottom of the grow tent to facilitate passive intake. These holes allow fresh air to enter without disrupting the plants.
Monitor Airflow:
Regularly check the airflow in the tent to ensure the fans function optimally. Clean or replace filters as needed.
Tips for Maintaining the Right Temperature and Humidity Levels:
Temperature Control:
Adjust the speed of the exhaust fan to control temperature. Increase airflow to cool the tent or decrease it to raise the temperature.
Humidity Management:
Use a hygrometer to monitor humidity levels. If humidity is too high, increase ventilation to expel excess moisture. If it’s too low, consider adding a humidifier.
Timed Ventilation:
Implement a timer for the exhaust fan to control the frequency and duration of air exchanges. This helps maintain consistent environmental conditions.
Air Circulation:
Ensure that fans are positioned to create gentle air circulation. Avoid direct airflow on plants to prevent stress.
Nighttime Ventilation:
During the dark period of the light cycle, reduce the frequency of air exchanges to prevent temperature fluctuations that can occur during the day.
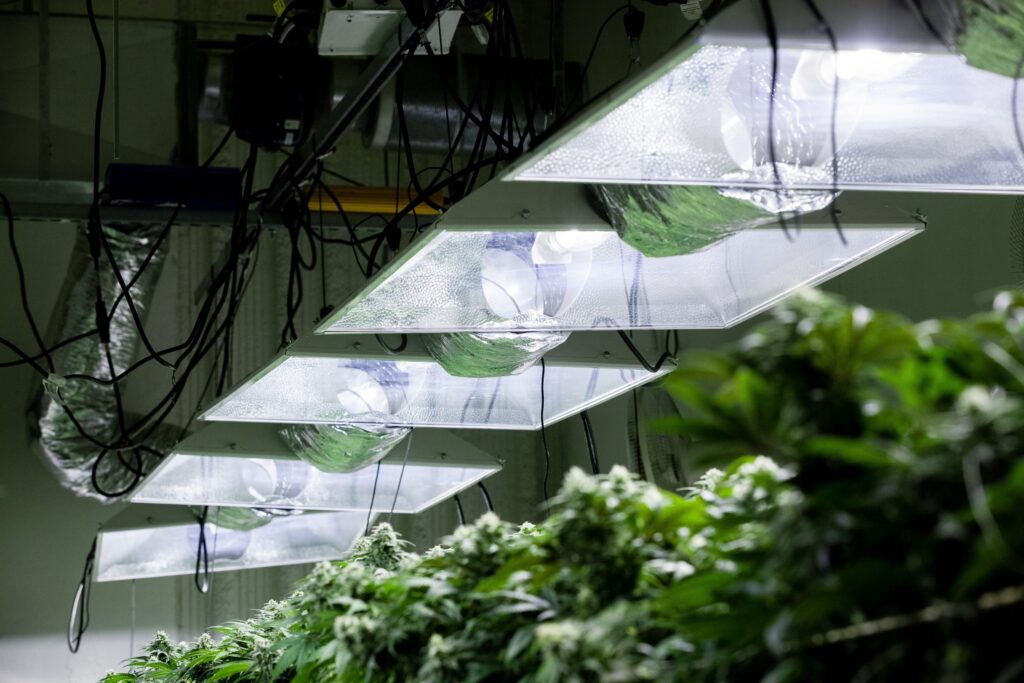
Lighting Setup:
Light Cycle:
Controlling the duration of light exposure (light cycle) is essential for triggering different growth phases, such as vegetative and flowering stages.
Intensity and Duration:
How much light plants get and how long they get it directly affects how healthy they are. It influences things like how strong the stems are, how leaves grow, and how many flowers they make.
Types of Grow Lights and Their Suitability for Different Plants:
LED Grow Lights:
Pros: Energy-efficient, long lifespan, customizable spectrum.
Suitability: Suitable for all growth stages and various plant types.
High-Intensity Discharge (HID) Lights:
Pros: High light intensity, effective for flowering.
Cons: Higher energy consumption and heat production.
Suitability: Suitable for flowering stages of larger plants.
Fluorescent Lights (CFL and T5):
Pros: Energy-efficient, low heat production.
Cons: Lower light intensity.
Suitability: Suitable for seedlings, herbs, and low-light plants.
Induction Grow Lights:
Pros: Long lifespan, low heat production.
Cons: Limited spectrum options.
Suitability: Suitable for various growth stages, especially for energy efficiency.
Plasma Grow Lights:
Pros: Full spectrum, efficient.
Cons: Higher cost.
Suitability: Suitable for all growth stages, especially for full-spectrum requirements.
Tips for Positioning and Adjusting Lights Within the Grow Tent:
Adjustable Hanging Systems:
Use adjustable hanging systems to modify the height of lights as plants grow. Maintain the recommended distance between lights and plants to prevent light burn.
Light Spectrum Adjustments:
Customize the light spectrum based on the growth stage. For example, use a higher ratio of blue light during the vegetative stage and more red light during flowering.
Lighting Schedule:
Set up a consistent lighting schedule, adhering to the recommended light cycle for each growth stage. Use a timer to automate the process.
Temperature Management:
Monitor the temperature inside the grow tent, especially if using high-intensity lights. Use proper ventilation to dissipate heat and prevent overheating.
Lighting Distance:
Follow the manufacturer’s recommendations for the optimal distance between the lights and the plant canopy. Adjust this distance as plants grow to avoid light stress.
Regular Maintenance:
Clean light fixtures and reflectors regularly to maximize light output. Replace bulbs as needed, following the recommended lifespan.
Sealing and Lightproofing:
Ensuring Light-Tightness for Light-Sensitive Plants:
Importance of Light-Tightness:
Light-sensitive plants, especially those in the flowering stage, require a dark period. Ensuring light-tightness prevents interruptions in the light cycle and promotes proper plant development.
Potential Issues:
Light leaks can disrupt the natural light cycle, leading to stress, reduced yields, and other issues for light-sensitive plants.
Monitoring Light Intensity:
Some plants are sensitive to even small amounts of light during their dark period. Use blackout curtains or materials to prevent external light from entering the grow tent.
Tips for Sealing Potential Light Leaks:
Inspect the Grow Tent:
Regularly inspect the entire grow tent for potential light leaks. Check seams, zippers, and any openings where light may penetrate.
Seal Zippers and Seams:
Use lightproof tape or covers to seal zippers and seams. Ensure that these areas are completely light-tight.
Ventilation Holes:
Seal ventilation holes with lightproof material or cover them during the dark period to prevent external light from entering.
Electrical Outlets and Gaps:
Seal gaps around electrical outlets, cables, or any other openings with lightproof materials. Ensure a tight seal to prevent light leaks.
Use Velcro Strips:
Attach lightproof Velcro strips to secure openings or flaps. This provides an additional layer of light protection.
Custom Light Barriers:
Create custom light barriers using cardboard, foam, or other lightproof materials to cover specific areas with potential leaks.
Blackout Curtains:
If the grow tent is located in a room with windows, use blackout curtains to block external light during the dark period.
Using Reflective Materials to Maximize Light Distribution:
Reflective Interior:
Line the interior walls of the grow tent with reflective materials, such as Mylar or reflective paint. This maximizes light distribution to all parts of the plants.
Avoid Absorptive Surfaces:
Choose materials that reflect light rather than absorb it. Dark or matte surfaces can absorb light, reducing its effectiveness.
Adjustable Reflectors:
Use adjustable reflectors or reflective panels to direct light to specific areas of the plants, especially lower branches and leaves.
Utilize Surrounding Surfaces:
Position the grow tent in a room with light-colored walls to enhance light reflection.
Regular Maintenance:
Keep reflective surfaces clean to maintain their effectiveness. Dust and dirt can reduce the reflective properties of materials over time.
Monitoring and Control Systems:
Introduction to Monitoring Tools for Temperature, Humidity, and More:
Thermometer and Hygrometer:
Keep track of the temperature and humidity in your grow tent using a good thermometer and hygrometer. This gives you important information to make sure everything stays just right.
pH Meter:
For soil-based growing systems, use a pH meter to monitor and adjust the acidity of the growing medium.
TDS/EC Meter:
Measure Total Dissolved Solids (TDS) or Electrical Conductivity (EC) to assess nutrient levels in the water and ensure proper nutrient concentrations for plants.
CO2 Monitor:
Monitor carbon dioxide levels within the grow tent, especially in sealed environments, to optimize photosynthesis.
Light Meter:
Check how strong the light is to ensure plants get the right amount they need for their growth stage.
Setting Up Automated Control Systems for a Hands-Free Approach:
Timers:
Use timers for lights and other equipment to automate the light cycle and maintain consistent environmental conditions.
Climate Controllers:
Invest in climate controllers that integrate with various sensors to automate temperature, humidity, and ventilation systems. These controllers can adjust settings based on predefined parameters.
Dosing Systems:
Consider dosing systems that automatically release nutrients based on set schedules or sensor feedback for hydroponic or automated watering systems.
Smart Controllers:
Explore smart controllers that allow you to program and monitor multiple aspects of the growing environment using a smartphone or computer.
Automated Ventilation:
Link fans and ventilation systems to controllers that change the fan speed depending on temperature and humidity levels.
Integrating Smart Technologies for Remote Monitoring and Adjustments:
Wi-Fi-Connected Sensors:
Choose sensors with Wi-Fi connectivity to enable remote monitoring. Receive real-time data and alerts on temperature, humidity, and other parameters through a mobile app or online platform.
Smart Plugs and Outlets:
Use smart plugs to control the power supply to equipment remotely. This allows you to turn devices on or off using a smartphone or voice commands.
Smart Thermostats:
Integrate smart thermostats to control heaters or cooling devices. Adjust settings remotely to maintain the desired temperature.
Cloud-Based Systems:
Utilize cloud-based monitoring and control systems that store historical data and allow you to adjust from anywhere with an internet connection.
Alert Systems:
Set up alert systems that notify you of critical conditions, such as temperature spikes or power outages, ensuring a prompt response to potential issues.
Camera Systems:
Install cameras for visual monitoring. Some smart camera systems include features like motion detection and live streaming, providing additional security and oversight.
By implementing monitoring tools, automated control systems, and smart technologies, you can streamline the management of your grow tent environment.
This enhances efficiency and allows for timely interventions to address deviations from the optimal growing conditions.
Maintenance and Troubleshooting:
Routine Maintenance Tasks for a Healthy Indoor Garden:
Cleaning:
Regularly clean the grow tent, including surfaces, reflective materials, and equipment, to prevent the buildup of dust and pests.
Inspecting Equipment:
Check the condition of lights, fans, and other equipment. Replace bulbs, filters, or any damaged components as needed.
Nutrient Management:
Monitor nutrient levels in hydroponic or soilless systems. Adjust nutrient solutions according to plant growth stages.
Watering:
Maintaining a consistent watering schedule ensures that plants receive adequate moisture without overwatering. Check for proper drainage in containers.
Pruning and Training:
Trim plants often to get rid of leaves or parts that are dead or hurt.
Implement training techniques to shape and manage plant growth, such as topping or LST (low-stress training).
Common Issues and Their Solutions:
Nutrient Deficiencies:
Issue: Yellowing leaves or stunted growth.
Solution: Adjust nutrient levels based on plant requirements. Use a balanced fertilizer.
Overwatering or Underwatering:
Issue: Root rot or wilting.
Solution: Change how often you water and make sure the water can drain well. Let the soil get a bit dry between watering times.
Light Burn:
Issue: Browning or yellowing of leaves.
Solution: Increase the distance between lights and plants, reduce light intensity, or adjust the light spectrum.
Pests and Diseases:
Issue: Visible pests or signs of diseases.
Solution: Implement pest management strategies, such as introducing beneficial insects or using organic pesticides. Isolate infected plants.
Temperature Fluctuations:
Issue: Stress, slow growth, or flowering issues.
Solution: Ensure proper ventilation and temperature control. Adjust lighting and ventilation systems as needed.
pH Imbalances:
Issue: Nutrient uptake problems, nutrient lockout.
Solution: Regularly check and adjust pH levels in the growing medium. Use pH-adjusting solutions as necessary.
Troubleshooting Guide for Potential Challenges:
Slow Growth:
Possible Causes: Insufficient light, nutrient imbalances, or root issues.
Troubleshooting: Increase light intensity, adjust nutrient levels, and check for root health.
Leaf Discoloration:
Possible Causes: Nutrient deficiencies, light stress, or pH imbalances.
Troubleshooting: Check nutrient levels, adjust lighting, and monitor pH. Address any identified issues.
Excessive Humidity:
Possible Causes: Poor ventilation or waterlogged growing medium.
Troubleshooting: Improve ventilation, adjust watering practices, and consider using a dehumidifier.
Unpleasant Odors:
Possible Causes: Poor ventilation or decaying plant matter.
Troubleshooting: Enhance ventilation, remove dead plant material, and use carbon filters to control odors.
Wilting Plants:
Possible Causes: Overwatering, underwatering, or root issues.
Troubleshooting: Adjust watering practices, ensure proper drainage, and inspect root health.
Regularly monitor your indoor garden, address issues promptly, and be proactive in maintaining optimal conditions.
A combination of preventative measures and quick responses to challenges will contribute to your plant’s overall health and success in the grow tent.
FAQs
What materials do I need to make a DIY grow tent?
PVC pipes or metal tubing for the frame, reflective material (such as Mylar), an exhaust fan, grow lights, and other accessories based on your specific setup.
What type of lights should I use in my DIY grow tent?
LED grow lights are energy-efficient and suitable for all growth stages. HID lights are also effective, especially for flowering stages.
How do I ensure stability when building the frame of the grow tent?
Use sturdy materials like PVC or metal tubing, secure connectors properly, and reinforce corners with additional supports or braces.
What is the purpose of ventilation in a grow tent?
Ventilation regulates temperature, controls humidity, ensures CO2 exchange, and helps manage odors, promoting a healthy environment for plant growth.
How do I seal potential light leaks in my grow tent?
Use lightproof tape or covers to seal zippers, seams, and ventilation holes. Ensure a tight seal around electrical outlets and other openings.
What monitoring tools do I need for my DIY grow tent?
Essential tools include a thermometer, hygrometer, pH meter, TDS/EC meter, CO2 monitor, and a light meter for comprehensive environmental monitoring.
Can I automate the control of environmental factors in my grow tent?
Yes, use timers for lights and fans, climate controllers for temperature and humidity, and smart technologies for remote monitoring and adjustments.
How do I troubleshoot common issues in my grow tent?
Regularly inspect plants for signs of nutrient deficiencies, pests, or diseases. Monitor environmental parameters and adjust as needed. Address issues promptly to ensure a healthy indoor garden.
Conclusion
In conclusion, creating and maintaining a successful indoor garden within a DIY grow tent involves careful planning, thoughtful selection of materials and equipment, and consistent monitoring.
Troubleshooting challenges promptly and adjusting your setup as needed will contribute to a thriving indoor garden.